I've hit a rough patch in my energy. The lip-syncing project requires significant development effort. I'm writing a program in C to do the initial lip-sync animation. However, my day job is also a Software Development job. I'm having a difficult time spending a few hours programming after having spent 10 hours doing programming work... But I just have to suck it up and get it done. I know what I'm suppose to do.
One good piece of advice I got from a couple of professionals in the rigging/animation field, is not to apply the animation directly on the model. Rather give the animator the option to select the key frames to insert. I've been thinking of a good work flow to do this.
I'm now considering, first marking the audio file with the phonemes. Then provide a way from the animator to jump to each phoneme or just use the time line to scrub to the marker. He'd then hit a button to insert the appropriate key frames. I think this would be easier to undo step by step if need be. Then the animator can fine tune the shape of the mouth, before moving to the next phoneme.
I'll have to do some trial and error to find the best workflow.
As we draw 2018 to a close, I'm updating what I have to do on the Open Movie Project. This is not a small project by any means. It spans many fields, from software development, to writing, pre-production work, 3D production and post production. Bound to keep me busy. But baby steps.
Proof of Concept
As I mentioned before I'd like to make a 30 second to 1 minute proof of concept short. This is the first fully animated series I've ever worked on. I need to figure out a workflow that suits me. A proof of concepts should do it for me. I already have a short scene written up, different from my previous post. I'm now working on storyboarding. I figure I need to do the following:
- Plan out the camera movement
- Conceptualize the set and look for references
- Build the models needed for the scene
- Story board
- Blocking
- Key Poses
- Record references
- Splining
- Smoothing
Obviously this is all going to be iterative. I need to really pay attention to how the final scene will work to avoid any time consuming re-work.
Software Development
In terms of Software development, there has been a few activities going on:
- I developed YAAM
- I submitted a few changes upstream to update Blender add-ons to blender 2.8, primarily A.N.T Landscape (currently under review).
- I updated the Cycles Material Vault add-on to work in blender 2.8, as well as a couple of other free add-ons available on the resources page.
In 2019 I hope to accomplish the following software development goals:
- Finish up my distributed renderer
- Create an integrated Screenwriting add-on for blender. My vision is to work only in blender and not to have to use different software for writing screen plays, and making storyboards etc.
There will probably be other minor updates I'll have to do over 2019.
Gonna be a busy year. We'll see if we'll have any contributors on the project.
Alrighty, then. I created a phoneme rig for ManuelBastioni Lab which looks like this:

As you can see each one of these dials represent the mouth shape which is formed to make the associated sound. These were taken from these references here and here.
The next step is to write a blender add-on which takes an audio clip, recognizes the phonemes, and then animates the phoneme rig shown above. Sounds simple eh? As I mentioned in earlier posts, there is a tool called rhubarb which does a similar job, but you know what, after flip-flopping on whether I should create my own or use rhubarb, I decided to create my own. And so, here is an outline of what the program will do:

Yet another update (YAU)... well it's been a while. Seems like the updates have been less frequent lately. The main reason for that is because I'm in the writing process. It takes me a long time to write something. I started off thinking I'll do a short film, but any story I thought about didn't take a short film form. It was either a feature length script or series format. Then I had some really negative feedback from a fellow, who claimed that he wanted to help me, but it didn't look like he did. Just a sequence of negative comments without any suggested improvements. To be fair, after I pointed that out to him, he back tracked and kept insisting that he's just being straightforward. Then gave me some feedback, which to be honest, was stuff I've already heard, but in a much more constructive way. One good thing that came out of this unfortunate experience is I decided to hire a guy to go over the script idea I had at the time. I spent a weekend with him and we hammered down some ideas. I thought it was very useful. The guy was knowledgeable and he did introduce me to Blake Snider's Save the Cat. That really helped.
Anyway, after that weekend, I spent a long time trying to work out a good outline for the story I had in mind using the Save the Cat beat sheet. Just when I had one done, my daughter suggested to me another story idea. She wanted me to help her write it. I decided to be a good dad and do that. The more I worked on her story the more it shaped up to be a very good fit for the open movie project. So, I decided to go with her idea and base the open movie endeavour on it.
I just finished draft one of the script and I'm working on revisions currently.
The story is about two kids who have to rescue a kidnapped baby and return him to his parents before Christmas day.
I'm still debating whether I should publish the script on this site.
Anyway, my next step is to polish the script and then get a bunch of feedback on it.
To start off I decided to make a short animated scene based on: https://youtu.be/qXPOl6EjbWg?t=96. The idea is to use that as training ground for setting up my animation workflow. The first part of this shot is Captain America running towards Winter Soldier. Decomposing the work further, I decided to make a run cycle. Here is what I have. Animation is tricky. I struggled getting a descent run cycle until I used a reference run. This is the key to getting good animation. What I have probably requires more polishing, but I don't want to get bogged down with all the details. I want to have a passable animation, then refine it later once I have a scene put together. We'll see how that works.
I've been working on setting up my animation flow. My end goal is to use MB-Lab to generate all my characters. However, I see cases, especially if I need 3D models of younger children, then I'll have to work with makehuman. For now, I'm concentrating on MB-Lab. To setup a character for animation, I need to do the following:
- Create the character in MB-Lab
- Extract/model 3D clothes (referred to as a proxy) for the character
- Fit your proxy on a standard MB-Lab character.
- What's nice about MB-Lab is you can setup different rest poses for the character. This is useful if you have clothes from a different model in the T-pose for example, then you don't have to do a lot of fiddling to fit the proxy on the MB-Lab character.
- You'll obviously need to look a bit ahead and plan out what proxies you're going to be using.
- What's nice about MB-Lab is you can setup different rest poses for the character. This is useful if you have clothes from a different model in the T-pose for example, then you don't have to do a lot of fiddling to fit the proxy on the MB-Lab character.
- Once you Fit your proxy to the stock MB-Lab Character, then save it in some asset directory. The blend file name needs to match the name of the model inside the blend file if you're going to use MB-Lab's native importer (I'm gonna re-write that bit).
- Fit the proxy on your MB-Lab character using MB-Lab's fitting too.
- I found that I need to go in and clean up some of the weight painting. It appears like MB-Lab is transferring the existing weight from the model onto the proxy. Works well most of the time.
- Clean up any intersections you might have with the proxy.
- Create a Rigify Rig instead of the MB-Lab rig.
Here are some videos. They are silent work flows. Useful only if you're willing to just speed through them and see what I'm doing
Well, I got around to doing some "modelling". Between quotes because I'm using the MB-Lab blender add-on. I did quiet a few tweaks to it, specifically, with the Eye shader and the face rig. I also went back to the original Manuel Bastioni Lab skin shader. He got it right the first time. The results, to my eyes, are better than what the official MB-Lab has. Anyway, I think I have my main character, Gemma. Still needs hair, but hey, it's 2019 :)
Even though, I wasn't really modelling, per say. I had to use a reference for the character. I used her: https://www.instagram.com/mona__hala/
If this ever gets made into a live action series, I'll ask her to play the main part... haha. Anyway, my point is that using a reference gave me a target to shoot for.


Been a long week at work. Hadn't had a chance to do much on this project. But now I have. I'd like to work out the kinks from my animation workflow. To do so, I'm going to make a short scene with multiple shots. Mainly an action sequence. I figure if I'm going to do something, might as well do something difficult and hone my skills. Here is what I came up with
Story
- Story Goal: Stop a bomb from going off
- She's hanging from her leg off a building
- She wakes up and looks down to see a long drop
- The rope goes loose
- She reaches the rope just in time before it slips from her leg
- She swings with the rope until she reaches a pipe.
- When she hangs on the pipe the pipe breaks
- She hangs on a window and climbs to the roof
- On the roof, she runs through some obstacles and jumps to the next roof
- She lands and rolls then back to her feet in front of a bomb
- The time on the bomb shows less than 10 seconds left
- She opens a little door on the side of the bomb to see a few wires
- She produces a knife hesitates and cuts the blue wire.
- The time freezes at 1 second
- She breathes out in relief
A simple render from the video I linked below. I think there is potential for this tool. It won't give you the best results out of the box, but it might give you a solid foundation to build on.
Got the facial expression add-on working. It can take a video file or a FACS csv file. The csv file takes precedence if present. If a csv file is given, then it parses the file and smooths the data, then animates the expressions. If a video file is provided, it runs it through OpenFace which produces the csv file, then the addon proceeds as previously described. There are a few parameters presented to the user:
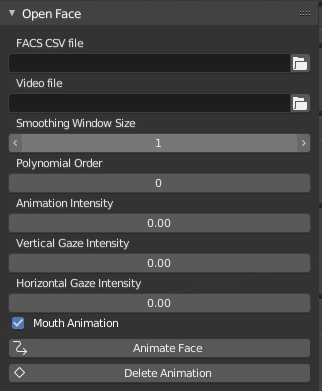
- Smoothing Window Size: the number of elements in the array to consider when smoothing out the data
- Polynomail Order: https://en.wikipedia.org/wiki/Order_of_a_polynomial
- Animation Intensity: by how much should the animation values be increased in percentage
- Vertical Gaze Intensity: the order by which to increase the vertical gaze values
- Horizontal Gaze Intensity: the order by which to increase the horizontal gaze values
- Mouth Animation: whether or not to include the mouth animation data
- Animate Face: Start the animation process
- Delete Animation: Delete existing animation
I spent the last couple of days experimenting with Blender 2.8, rigging and the such. It feels like I didn't accomplish much. But I was able to get a Makehuman model looking, meh. I took some elements from the Manuel Bastioni skin material and used it for the model. Rendered two images one in EEVEE and the other in cycles. I want to finish my face rig for the Manuel Bastioni model. I'll probably do that and then create a bunch of facial expressions, just to do some animation training. Or I might make the makehuman face rig a bit more user friendly, do some facial expressions and then move to finishing up the Manuel Bastioni face rig.
Here are my renders so far.


Well, I know I said that I might be reaching the point of diminishing returns, but alas, an interesting twist came along. I learned about an open source library call OpenFace which can capture facial expressions, as well do face recognition etc. Decided to learn more about it:
Working with NumesSanguis: https://github.com/NumesSanguis I gained a better understanding of FACS AU: https://www.cs.cmu.edu/~face/facs.htm, and OpenFace: https://github.com/TadasBaltrusaitis/... Basically OpenFace is able to extract features from a video and convert them to FACS AU. What I'm trying to do is grab the data generated by OpenFace and use it to create facial animation.
https://github.com/NumesSanguis/FACSv... does that.
My thoughts are to streamline the process a bit. The idea is to hit a button and it generates the facial animation.
Still a work in progress. You can take a look at: https://github.com/amirpavlo/BYASP
One cool thing I did is write a script which takes the AU data and smooths it. But more over, I don't want to insert a keyframe on every frame of the animation. Would be crazy to do that, and would be very difficult to adjust later on. So I got the idea of finding the peaks and troughs of the graph, then inserting key frames there only. I'm pretty pleased by myself.... haha. And to prove it works here is a diagram

Just completed some modifications to the ManuelBastioni YASP component to add some smoothing to the animation. I think it produces acceptable results for the first go. Most likely, I'll need to jump in and tweak later. But it does save a tone of time compared to if you had to go in manually and find where each phoneme is, etc. If nothing else, the mark pass of the add-on, where it marks the location of all the phonemes, provides value.
I think I got to a phase with the Automatic Lip Sync Project where any more effort I put in tweaking it would be beyond the point of diminishing returns. The only other thing worth putting effort in is making this a separate add-on and porting it to windows. I can see how this can be useful when working with makehuman characters. But I'll cross that bridge when I get to it.
The next step for me is to start using the tools I've created/modified to make a short scene. This will be key in working out the kinks from my workflow.
Here is a video I made playing around with lip-sync. The main purpose here is to show how the lip-sync and the facial animation can be combined. Note, this was recorded in real time, so it has pretty low fps.
https://github.com/amirpavlo/YAAM
Go get it. Try it out. Leave suggestions.
I'll be using it for the 30 second chase sequence next on my list. I'm pretty sure I'll think up of more features to add as I start using it.
The next software project for this Open Movie will be a distributed renderer. I already have a python command line version, but I want to create a C/C++ one with a GUI interface. I have a design, but I'll probably want to get some animation going before I tackle that project.
